
streak srm2 tagged posts
Excellent Shadowhawk 2D2 Brawler Guide
![]()
It is now widely accepted (but not proven) that the Shadowhawk is the most versatile and viable of all the Project Phoenix Mechs. This build is another extremely good argument why this claims are probably true. A Shadowhawk 2D2 equipped with all the 270m range goodness (AC/20, Medium Lasers, StreakSRM2) will make you a fearsome brawler. Speed, firepower, agility, and armor are very nicely balanced making this an absolute bad boy on the battlefield. Smegmw from HBA is one of the first to come up with this build and many have copied it since. I have started to use it myself, and although I am a sh1tty Medium pilot, I melt faces with this thing, doing 400-600 damage without any basic upgrades. If you have ordered a Project Phoenix package which includes the Shadowhawk, I definitely recommend checking this build out. It is also very cheap to build c-bill wise.
The armor distribution on the Smurfy link is close to optimal. Depending on your play style you might want to shift a few armor points from the legs to the arms. However, this won’t probably make too much of a difference. Also note that this build is very cheap c-bill wise. Assuming you have none of the parts you will only need 4.6M c-bills. You might want to add Artemis, as well, in order to improve StreakSRM2 lock-on times.
- Use your arms to absorb incoming fire if you can’t hide fast enough. If you lose one of your Medium Lasers, you are still more than fine.
- Your main damage is coming from your AC/20. Make sure every hit counts and avoid firing it over great distances. Shoulders aka side torsos of your enemies are prime targets.
- If you are running high on heat, stop firing your StreakSRM2s. If you are still on high heat, stop firing your Medium Lasers, as well. Focus solely on placing a couple good AC/20 hits.
- Do not fire while turning with your keyboard. Instead, adjust your Mech first, then use your mouse to place precise shots.
- Use your jump jets! They are not only for easier cliff climbing or poptarting. When engaging enemies, use them to look over small ledges and other obstacles which block your line of fire. You will most certainly get a couple of hits in before you are even there.
- Always soften your falls with Jump Jets in order to avoid unneccessary damage to your legs. Some of your most important components are in your legs.
Get Connected!
If you know of an excellent build, resource, or guide, submit it and maybe it will be featured on mwo-builds.net and seen by thousands of players. You can submit builds by sending us an e-mail, post it in the official looking-for-builds thread, or send us a private message via the official forums. You can also submit guides and builds via Facebook or Twitter (see below). Join hundreds of other Mechwarrior enthusiasts and like us on Facebook and follow us on Twitter. Receive the latest guides and the best MWO builds directly to your favourite social platform!| Follow @mwobuildsnet |
Read More
Shadowhawk 2H (Project Phoenix Hero Mech) Juggernaut/Brawler Build
![]()
It seems that, in terms of actual combat effectiveness, the Shadowhawk is pulling ahead of the other Project Phoenix Mechs. This might change over time, as more and more builds are being figured out. However, at the moment Shadowhawks are destroying PUG matches on a regular basis. The Shadowhawk is the Project Phoenix’s Medium Mech weighing 55 tons. It has multiple hardpoints for every weapon type making it a very versatile Mech. Add Jump Jets to the mix, and you got a deadly and agile ninja, pacing around the battlefield, dishing out sick damage numbers. The damage is usually so high that a skilled Shadowhawk pilot with the right build must not fear a comparison with other Heavy and Assault pilots! This post will provide you with a rough outline of an allrounder build for the Shadowhawk 2H, the Project Phoenix Hero Mech variant.
Pay close attention to the armor distribution and emulate it to the point. Once you have some experience with the build you might want to adjust a couple points to your liking, but this allocation is already very polished and prooved its worthiness in a lot of battles. If you don’t have the engine lying around, you can also make this build work using an XL-300 (drop one UltraAC/5 ammo and increase armor on legs and left arm).
![]()
- Use your right arm as a shield. If you have incoming damage (especially ballistics or missiles of any kind), turn your upper torso quickly. Your shield arm has no armor on it, but it will still reduce the incoming damage greatly.
- At the beginning of matches and during long range stand-offs, use your UltraAC/5 to harass over great distances. It will wear down your opponent and, more importantly, scare him into cover.
- Your ER Large Laser should be constantly firing. Whenever you see a target popping up somewhere: shoot it! This will amount to high damage numbers at the end of the round and is very easy to do.
- The ammo distribution in this load-out puts a clear emphasis on extended use of the UltraAC/5. If you find yourself running out of StreakSRM2 ammo multiple times, exchange one ton of ballistics ammo for a second ton of StreakSRM2 ammo.
- This build is not considered to be an effective brawler. If you are entangled in close quarter fights, move a bit further away. Do not stop, do not engage. Keep firing your ER Large Laser and StreakSRM2s and get the hell out. You can dish out insane amounts of damage, but you can not take a lot.
- Weapon grouping advice: 1) UltraAC/5 2) ER Large Laser 3) Both StreakSRM2s 4) All weapons (optional)
- For modules use any combination of the following (in order of usefulness for random public games): Adv Seismic Sensor, Adv Sensor Range, Cool Shot 9 by 9, Faster Target Info Gathering, Artillery Strike.
Get Connected!
If you know of an excellent build, resource, or guide, submit it and maybe it will be featured on mwo-builds.net and seen by thousands of players. You can submit builds by sending us an e-mail, post it in the official looking-for-builds thread, or send us a private message via the official forums. You can also submit guides and builds via Facebook or Twitter (see below). Join hundreds of other Mechwarrior enthusiasts and like us on Facebook and follow us on Twitter. Receive the latest guides and the best MWO builds directly to your favourite social platform!| Follow @mwobuildsnet |
Read More
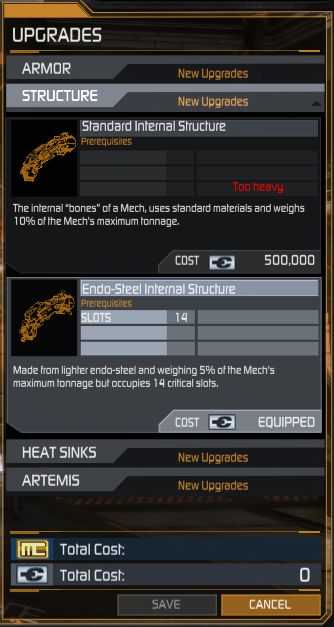
Endo Steel Structure is a Mech upgrade that you may purchase for roughly one million c-bills on every Mech (depending on Mech size). It will provide you with a hand full more tons (5% of the total weight) to play with but also occupy many critical slots (the lines where you put your equipment in).
Cost versus gain
Depending on your mech´s size the upgrade will roughly cost one million c-bills. Beware that undoing the upgrade will cost you roughly half that amount again! In addition,you will lose internal space to put items, called critical slots; 14 to be precise. In turn your mech´s structure will weigh only half and thus adding 5% more tonnage to play with. These 5% depend on your Mech size and can be calculated as “Maximum tonnage times .05″. Example: for an Atlas you will have 100 tons and upgrading Endo Steel Structure will yield you 5 additional tons. A Hunchback weighing only 50 tons will get a bonus of 2.5 tons.
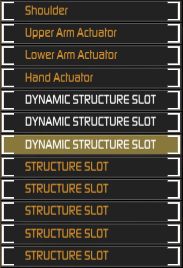
Dynamic Structure Slots
How does it work ingame: Dynamic Structure Slots
Once you´ve purchased the Endo Steel Structure upgrade, you will notice two new kinds of items appearing in your critical slots (the lines where you equip your stuff): Dynamic Structure Slot and Structure Slot. These mark the places where the Endo Steel Structure resides within your Mech. However, they can be automatically moved to a certain extent: Dynamic Structure Slots can be treated like free slots. The Structure will be moved to another part of your Mech (where ever some space is left), and you can mount your items in Dynamic Structure Slots like in any other free slot.
Once you no longer see Dynamic Structure Slots you are out of space. If you are out of space and still have some tons left, I´d recommend maxing out armor and see if you can upgrade a weapon to something heavier without using up (much) more space e.g. Medium Laser to Medium Pulse Laser.
When to purchase Endo Steel Structure
The following list will give you a rough idea on when to consider Endo Steel and when you should think of something else. However, certain situations and builds may contradict these guidelines.
- Endo Steel Structure is highly recommended on light and medium Mechs. Heavys often times but normally never a good idea on Assaults.
- If you need more heat sinks and/or more ammunition do not go for Endo Steel, but consider upgrading to Double Heat Sinks.
- If you are planning not to put much/anything in your arms go for Endo Steel Upgrade.
- The smaller/lighter your Mech the higher the chance Endo Steel is worth a look.
- If your Mech runs with a lot of lasers, stream srm2 and other small weapons with little/no ammo Endo Steel Structure is worth a look, too.












Get Connected!