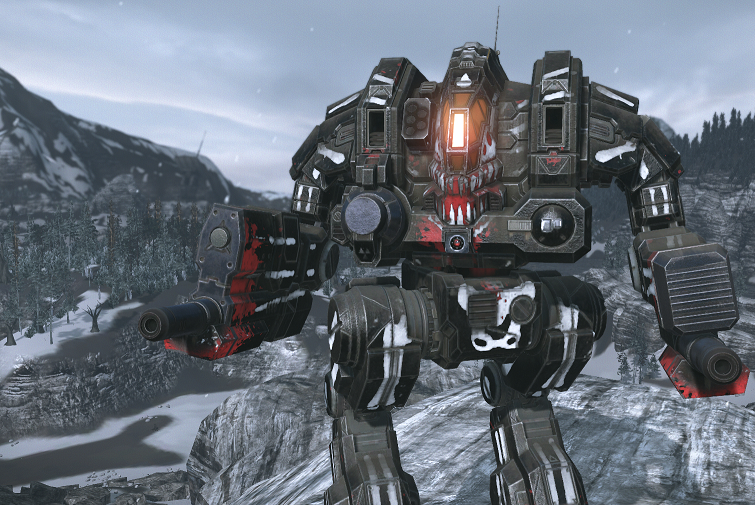
 Commando
 Death’s Knell
 Raven
Raven Spider
 Hunchback
 Blackjack
 Centurion
 Yen-Lo-Wang
 Cataphract
 Ilya Muromets
 Jagermech
 Firebrand
 Quickdraw
 Atlas
Atlas Awesome
 Pretty Baby
 Battlemaster
 Highlander
 Stalker
 Misery
 Ballistic Weapons
 Lasers and PPCs
 Short Range Missiles
 Long Range Missiles
-
Do You Play other Games, too?
1 Aug 2014
-
The Best Shadowhawk 2D2 Brawler
13 Nov 2013
-
Competetive Spider 5D Build
7 Nov 2013

-
Shadowhawk 2H (P) Damage Dealer
23 Oct 2013
Category Sniper / 3rd Line
Battlemaster 1G (Phoenix Hero Variant) Pubstomper Guide
![]()
Project Phoenix has arrived, and people have already come up with decent builds for Shadowhawks and Locusts. However, good Battlemaster builds are much harder to come by. The build presented here is a big mile stone in the development of the Battlemaster. It has everything you need: Long range high pinpoint damage, close quarter punch, and above average survivability. Two AC/5s and a single PPC provide excellent sniping and fire support capabilities. Six (6!) Medium Lasers allow you to dish out insane damage at close range. You can also continue to fire your double AC/5s while brawling. Finally, the Battlemaster is an Assault Mech and this build utilises a standard engine making it very durable. Let’s take a look at the build.
![]()
There are a few minor adjustments possible, depending on your preferred play style. For example, if you are more comfortable having all sniper weapons on your arms for increased precision, you can swap the PPC to your right arm and move the Medium Laser to the torso. While this is more comfortable, it is also less effective. Sniping around corners becomes more difficult and you will lose more important weapons when using your right arm as a shield arm. Addition of AMS is also possible, just remove any of the Medium Lasers, AC/5 ammo, or DHS to free up the tonnage. However, do not remove armor from your head. The cockpit is really easy to hit at the moment and you need every point of armor on it.
![]()
- PPCs have a minimum range of 90ms. Do not fire them beyond that range ever. You will overheat and die miserably.
- In high heat situations stop firing your PPCs immediately. You will always do more damage, if you do not overheat and use your AC/5s exclusively.
- AC/5s reload much faster than PPCs. Try working in at least one additional AC/5s salvo in between PPC recycle times when engaged at longer ranges.
- Use your right arm as a shield. One of your most vulnerable spots is you center torso. Try to protect it at all times.
- The Battlermaster’s upper torso twisting angle is very crappy. Keep this in mind when crossing through open spaces. Try to back up against a wall when engaged in close quarters.
- If you are playing in an organised group it is highly recommended allocating almost every point of armor in the front. If you are playing random games without a group, 10-25 rear armor are probably the better choice.
- Weapon grouping advice: 1) PPC and both AC/5s 2) All Medium Lasers 3) Both AC/5s only
- For modules use Cool Shot 9 by 9, Advanced Sensor Range, and Advanced Seismic Sensor. You can play around with the Advanced Zoom Module in exchange for the Advanced Seismic Sensor.
Get Connected!
If you know of an excellent build, resource, or guide, submit it and maybe it will be featured on mwo-builds.net and seen by thousands of players. You can submit builds by sending us an e-mail, post it in the official looking-for-builds thread, or send us a private message via the official forums. You can also submit guides and builds via Facebook or Twitter (see below). Join hundreds of other Mechwarrior enthusiasts and like us on Facebook and follow us on Twitter. Receive the latest guides and the best MWO builds directly to your favourite social platform!| Follow @mwobuildsnet |
People who read this guide also read:

Viable Highlander 733C Load-Outs for 12 vs 12
![]()
Did you ever wonder what some of THE most used builds in high-level 12 vs 12 look like? Well, wonder no more as this guide will show you some of the semi-secret builds that pro-level players are using everyday. This guide in particular will focus on the Highlander 733C. It’s hardpoint layout and high tonnage allows it to bring highly targeted damage to the frontlines while still remaining surprisingly agile for an Assault Mech. With the old PPC-Gauss-Sniper builds gone, the attention has shifted to other ballistic weapons, namely the AC/10, AC/5, and AC/20. This Highlander Competetive Guide will showcase three different versions of a Highlander 733C sniper build which is used by the best of the best.
![]()
The first version is probably the most easy to use. If you are new to the Highlander chassis and jump-sniping (aka “pop tarting) in particular, I highly recommend this build. It is very effective even if you are not jump-sniping. A standard engine and AMS provide excellent durability.
The second version is basically the deluxe version of the first one. You will have more armor, higher movement speed, and enough heat dissipation to fire an additional alpha strike. However, you are also slightly more vulnerable since your Mech uses an XL-engine. This build is lethal in the hands of an experienced pilot.
Lastly, you can switch out the AC/20 for double AC/5s. Your firepower and pinpoint damage will be reduced, but your overall damage increases. The build is slightly more heat efficient and is more effective over long ranges. If you can work in a second alpha with only the AC/5s inbetween regular full alpha strikes, you will demolish every enemy.
![]()
- PPCs have a minimum range of 90ms. Do NOT fire them beyond that range ever. You will overheat and die miserably in close quarter fights.
- All your weapons are on the right side of your Mech. Whenever you can not return fire, twist your upper torso to protect these weapons and absorb the damage with your unimportant arm.
- Use your jump-jets to peak over rocks, buildings, and ledges. Try to release an alpha strike on your way down.
- If you are playing in an organised group it is highly recommended allocating almost every point of armor in the front. If you are playing random games without a group, 15-25 rear armor are highly recommended as well you can try online casino games at clickspark.it you can find very important info about this last ones.
- Weapon grouping advice: 1) All weapons 2) PPCs only 3) AC(s) only
- For modules use Cool Shot 9 by 9, Advanced Sensor Range, and Advanced Seismic Sensor. If you are running the 3rd version (with 2x AC/5s) you can play around with the Advanced Zoom Module in exchange for the Advanced Seismic Sensor.
Get Connected!
If you know of an excellent build, resource, or guide, submit it and maybe it will be featured on mwo-builds.net and seen by thousands of players. You can submit builds by sending us an e-mail, post it in the official looking-for-builds thread, or send us a private message via the official forums. You can also submit guides and builds via Facebook or Twitter (see below). Join hundreds of other Mechwarrior enthusiasts and like us on Facebook and follow us on Twitter. Receive the latest guides and the best MWO builds directly to your favourite social platform!| Follow @mwobuildsnet |
People who read this guide also read:
What is the best, most optimized, polished, and efficient PPC/Gauss sniper build in Mechwarrior Online?
Short Answer: this one!
Long Answer
PPCs and Gauss Rifles form a unique and powerful combination. High pin-point damage combined with an excellent range. Every chassis which has 2 energy hardpoints and which can equip a Gauss Rifle is theoretically able to use such a sniper build. However, if your Mech is not agile it can’t utilize the weapons. If you have low armor and/or an xl-engine, you will have no chance to withstand counter-sniper fire and LRM salvos. Using an assault Mech seems reasonable and all assault chassis (except the Awesome) have at least one variant which can realize such a sniper build. You don’t want to go too heavy though since you would be wasting tonnage which could be additional speed and manoeuvrability.
The Highlander 733C really is the best variant to build this thing. 40 Gauss Ammo to last you exactly as long as a 12vs12 match. Insanely high heat dissipation allowing you to fire constantly for 10 or more times. Other Mechs will overheat after their 3rd salvo, and you will be the grinning a*shole still blasting their shoulders, legs, and weapons apart. A single jump jet allows you to cross a chasm on Canyon Network and pop-tart effectively. Survivability is extremely high, as well, since you are rocking over 450 armor and using a standard engine. Most other sniper builds will use an xl-engine making them easy prey for you. All weapons are parked on one side of your Mech, allowing you to sneak around corners and using your naked arm as a simple shield. Together with the jump jets you should be able to spread the damage across your whole chassis very easily, allowing you to live more than twice as long as your opponents.
The 733C Highlander Sniper build is used by multiple top tier players, amongst which is the infamous Kaffeangst of Hell’s Black Aces. He scored a first place in all but one tournament so far. Check out his twitch.tv stream and see this build live in action.
If you do not own a Highlander 733C, you can still work with the following builds. They are not that much worse. They are just not as perfect as the 733C. There are also several other variants which can be used to build sniper builds, for example the Cataphract 3D. Here are three more builds for comparison and reference: Dragon Slayer, Misery, and Highlander 732.
The Dragon Slayer sacrifices heat efficiency for mobility. The Victor Hero Mech is much more fragile and uses an xl-engine, making your Mech susceptible to carefully placed shots at your shoulders. If you are looking for a decent Dragon Slayer build, this one is not recommended, since it does not use both ballistic hard points. There are other more powerful builds out there which utilise AC/5s and other auto cannon calibre sizes to be more effective in competitive gaming. This build is just here for demonstrative reasons. After all, it is an effective PPC/Gauss Sniper Build.
Misery, Stalker Hero Mech, suffered a lot from the introduction of ghost heat. The Stalker has no jump jets and is not as agile as, for example, the Highlander. Although, the load-out is almost identical, the play-style is very different. You will have to move slower and more cautiously, acting from behind the front lines. Choose your positions and battles wisely, since you can not easily back out, once you have been spotted or overwhelmed. A good Misery sniper is always shooting, but never eating return fire.
The same load-out with a stronger engine and on a 732. This version of the sniper build plays very similar to the 733C, however, it is not as heat efficient. This build is just here to illustrate a similar load-out, which trades heat efficiency for slightly increased agility. Of course, one can also turn the Heavy Metal, Highlander Hero Mech, into such a sniper. If you own multiple Highlanders or are thinking about getting a new variant, I definitely recommend the 733C.
Conclusion
After all is said and done, the 733C comes out at the top as the sole winner in the contest for the best PPC/Gauss sniper build in Mechwarrior Online. Especially, if you are a skilled pilot and know how to pop-tart, the proposed version here does not hinder you and let’s you do all the nasty stuff you always dreamt about.
Be sure to check out Kaffeangst’s Stream. He plays almost daily in small groups and a lot of 12vs12.
If you would like to read more about the mechanics behind these builds check out the Alpha Strike, Firepower, and DPS Guide or the excellent guide on the new ghost heat system (explained without any math!).
Get Connected!
If you know of an excellent build, resource, or guide, submit it and maybe it will be featured on mwo-builds.net and seen by thousands of players. You can submit builds by sending us an e-mail, post it in the official looking-for-builds thread, or send us a private message via the official forums. You can also submit guides and builds via Facebook or Twitter (see below). Join hundreds of other Mechwarrior enthusiasts and like us on Facebook and follow us on Twitter. Receive the latest guides and the best MWO builds directly to your favourite social platform!| Follow @mwobuildsnet |
People who read this guide also read:
Misery (Stalker Hero Mech) Sniper/Fire Support Hybrid Guide
![]()
In my long search for finding a good Misery all-round build, I suffered many setbacks. After consulting with several high-level players from the Hell’s Black Aces merc-corp, I finally developed a build which is worthy of this web page. A sniper/fire support hybrid build utilizing a pair of Large Lasers, a single ERPPC, and a Gauss Rifle. All of this while still being reasonably heat efficient and using a standard engine. The only downside, in comparison to other Stalker builds, is its relatively low movement speed. This guide will showcase several variations of the same build. Each build has a slightly different focus. Choose the one whichever suits your play-style and needs best.
![]()
The first version of the Misery sniper hybrid build trades leg armor and heat efficiency for more utility. ER Large Lasers replace the regular Large Lasers for additional range. The increased effective range will greatly improve your damage dealt values. ER Large Lasers also received a buff in the recent patch. The original version uses two tons of Gauss Rifle ammo. If you are engaged in drawn out fights (which is more likely since 12 vs 12 hit the servers), 20 shots will be expended very quickly. This version uses the additional space and tonnage to fit in a third ton of ammo. The addition of an AMS rounds the package. This version runs very hot, and you will most likely not be able to carry a cool-shot consumable since the Stalker chassis only allows for two module slots (which are most likely taken by Adv Seismic Sensor and Increased Sensor Range).
The following load-out reflects the original version of the build. It has a lesser range, fewer ammo, and no AMS. However, it runs significantly cooler, allowing a skilled pilot to continuously fire for a long time. This version is recommended for more experienced as it requires more skill to dish out the same amounts of damage of the course of a battle. However, it has the potential to be more deadly in the long run.
![]()
- Since you are not very fast and lack jump-jets, positioning is key. Only expose yourself from cover to fire one alpha strike. If enemies have spotted you and are returning fire, double back behind cover and find a different spot to peak out from.
- Weapon grouping advice: 1] Gauss Rifle + ERPPC 2] Both (ER) Large Lasers. Be sure to bind the Gauss Rifle and ERPPC to a single weapon group as well. There are situations when you’ll want to fire only one of them.
- Try to stay on target while firing the Large Lasers. If you manage to hit the same component for the majority of the duration, you will notice a significant increase in efficiency. Large Lasers do a lot of damage, but over a duration. Remember: Lasers in MWO are no light sabres!
- Enabling Arm-Lock is not recommended for this build. However, whenever you can, try to match both crosshairs before firing a sniper shoot (ERPPC + Gauss Rifle) for maximum pin-point damage.
- If you are running on high heat, get behind cover and cool down for a few seconds. If that is not possible, place one or two well aimed shots with your Gauss Rifle. Then finish the exposed target with an alpha strike.
![]()
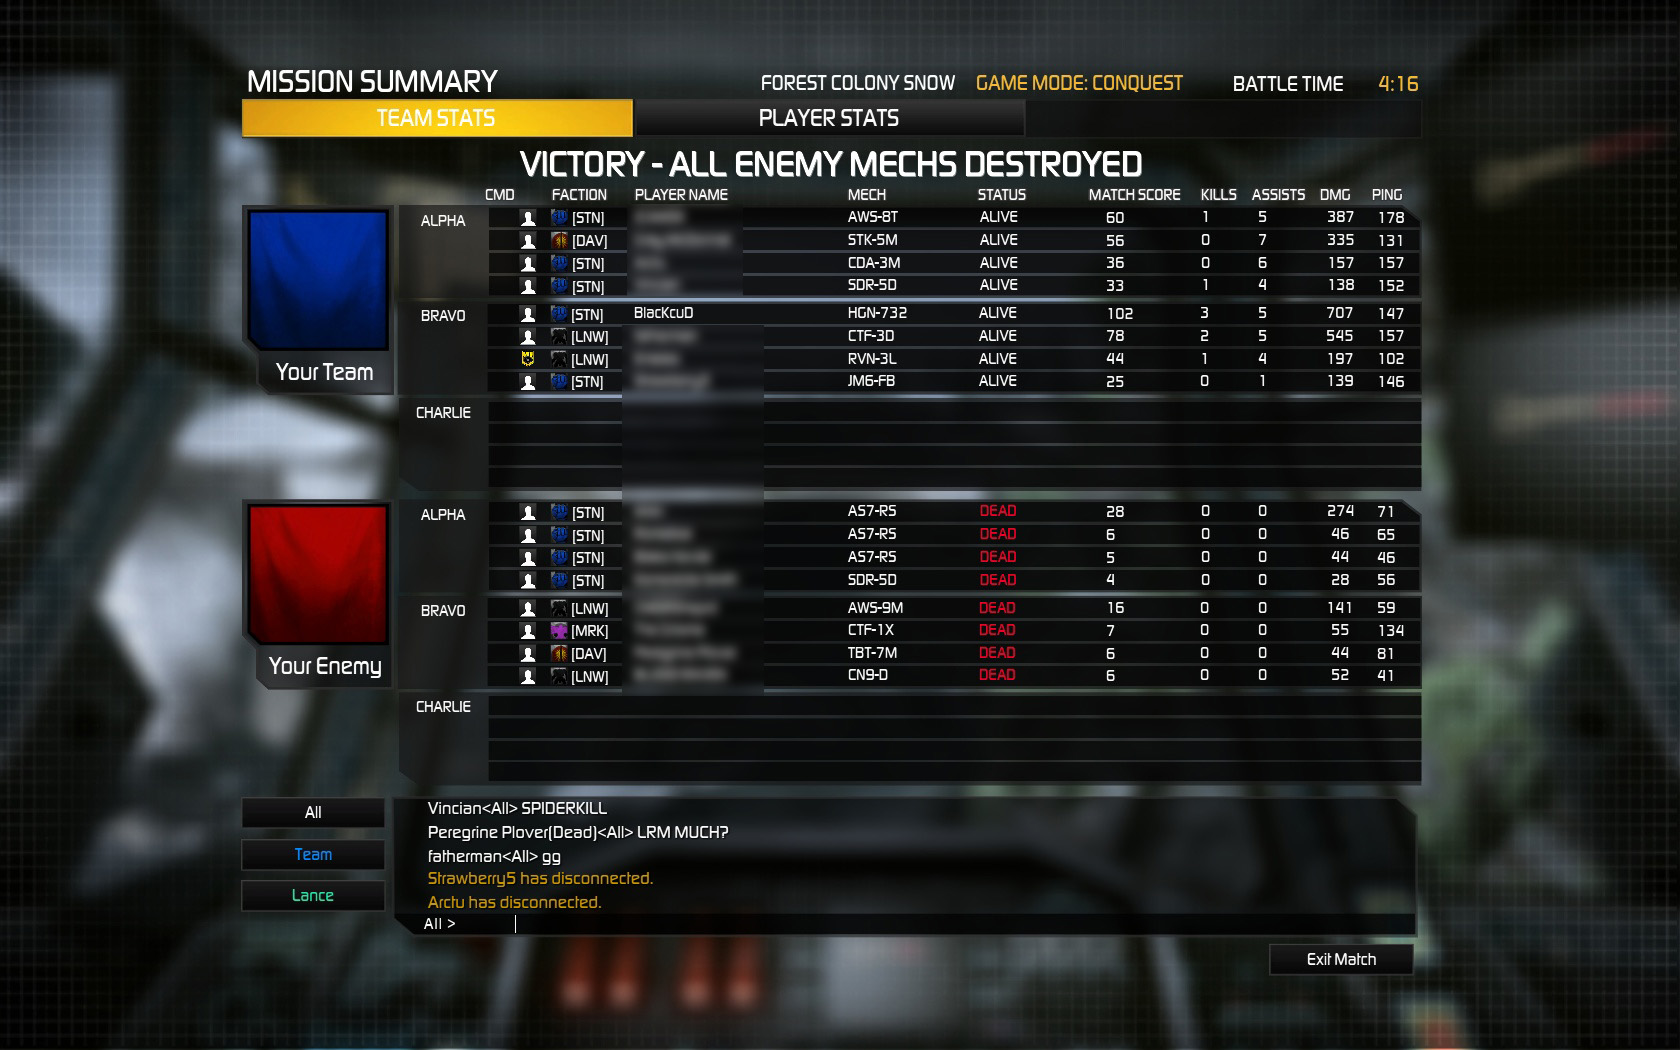
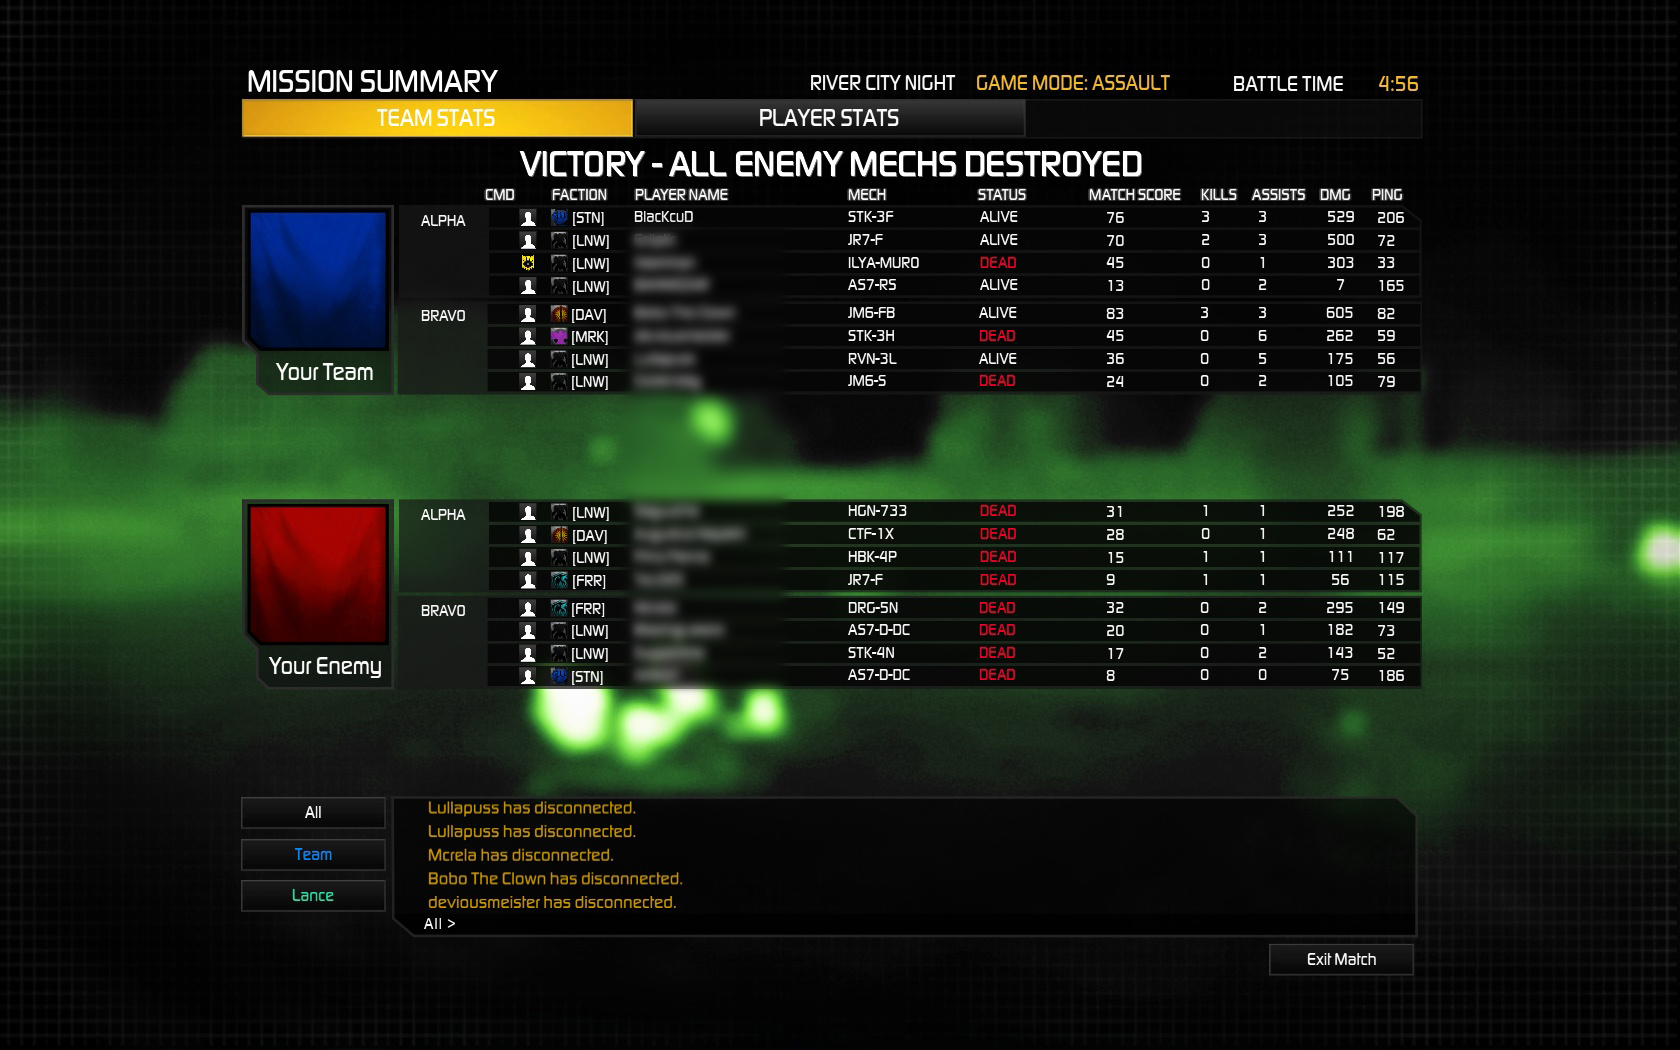
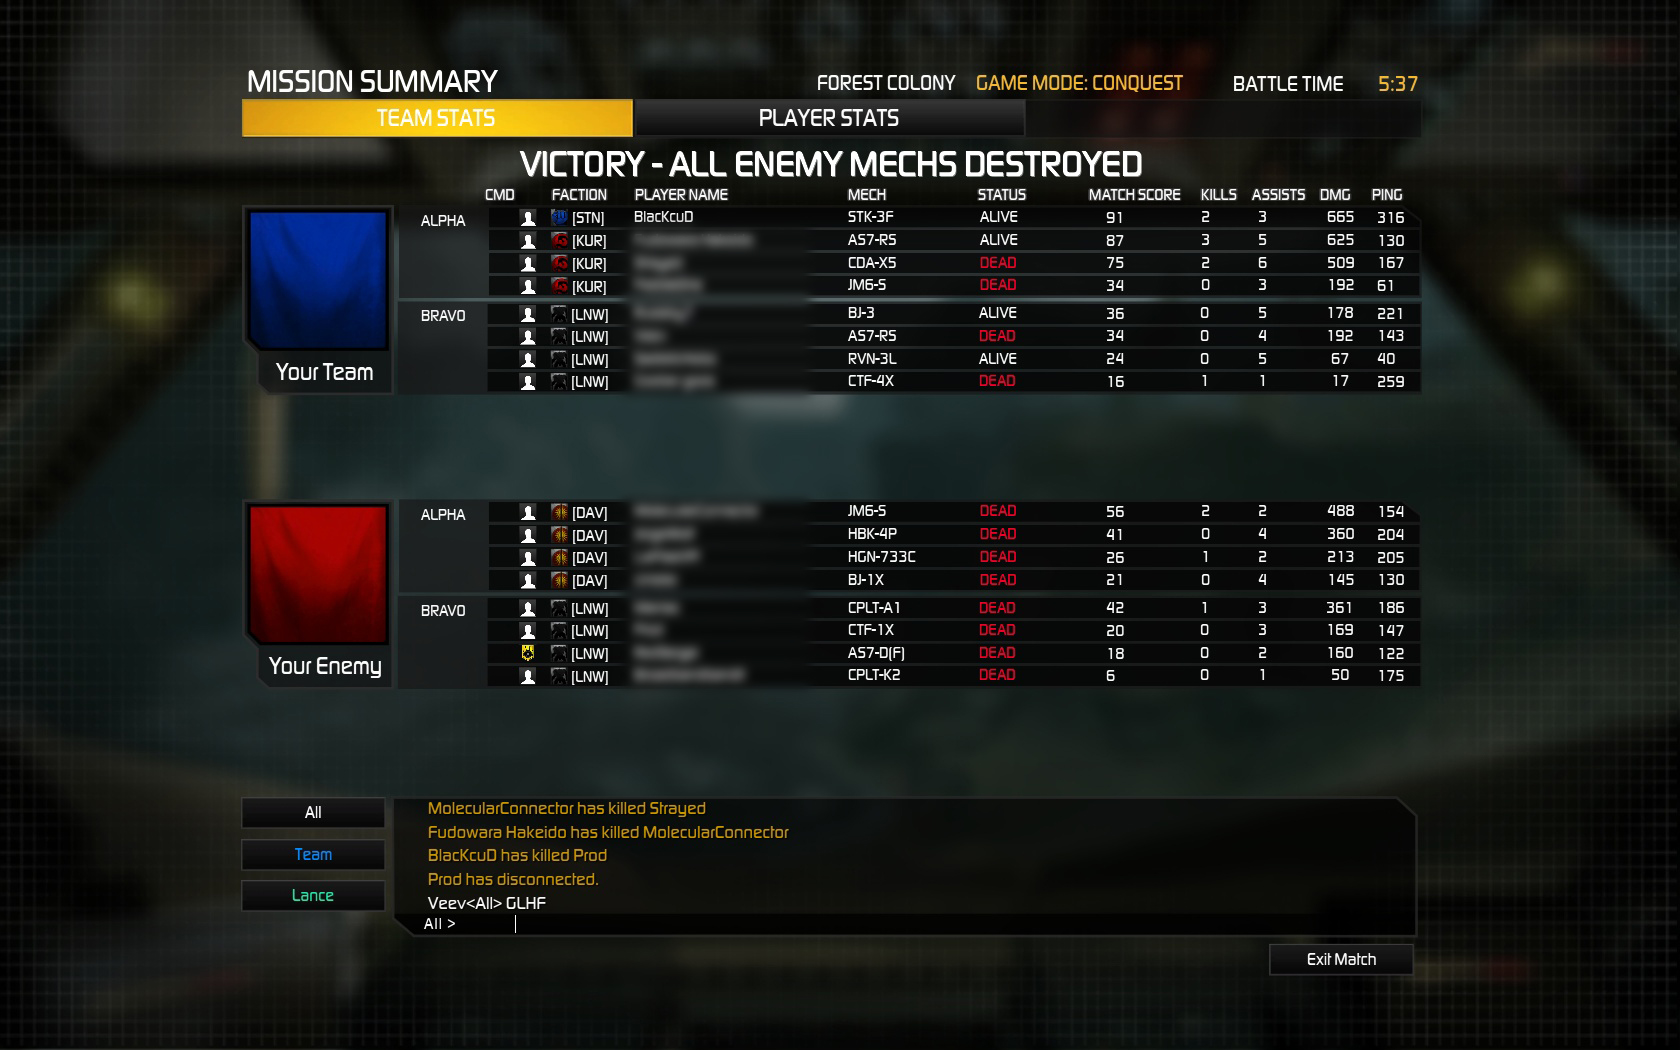
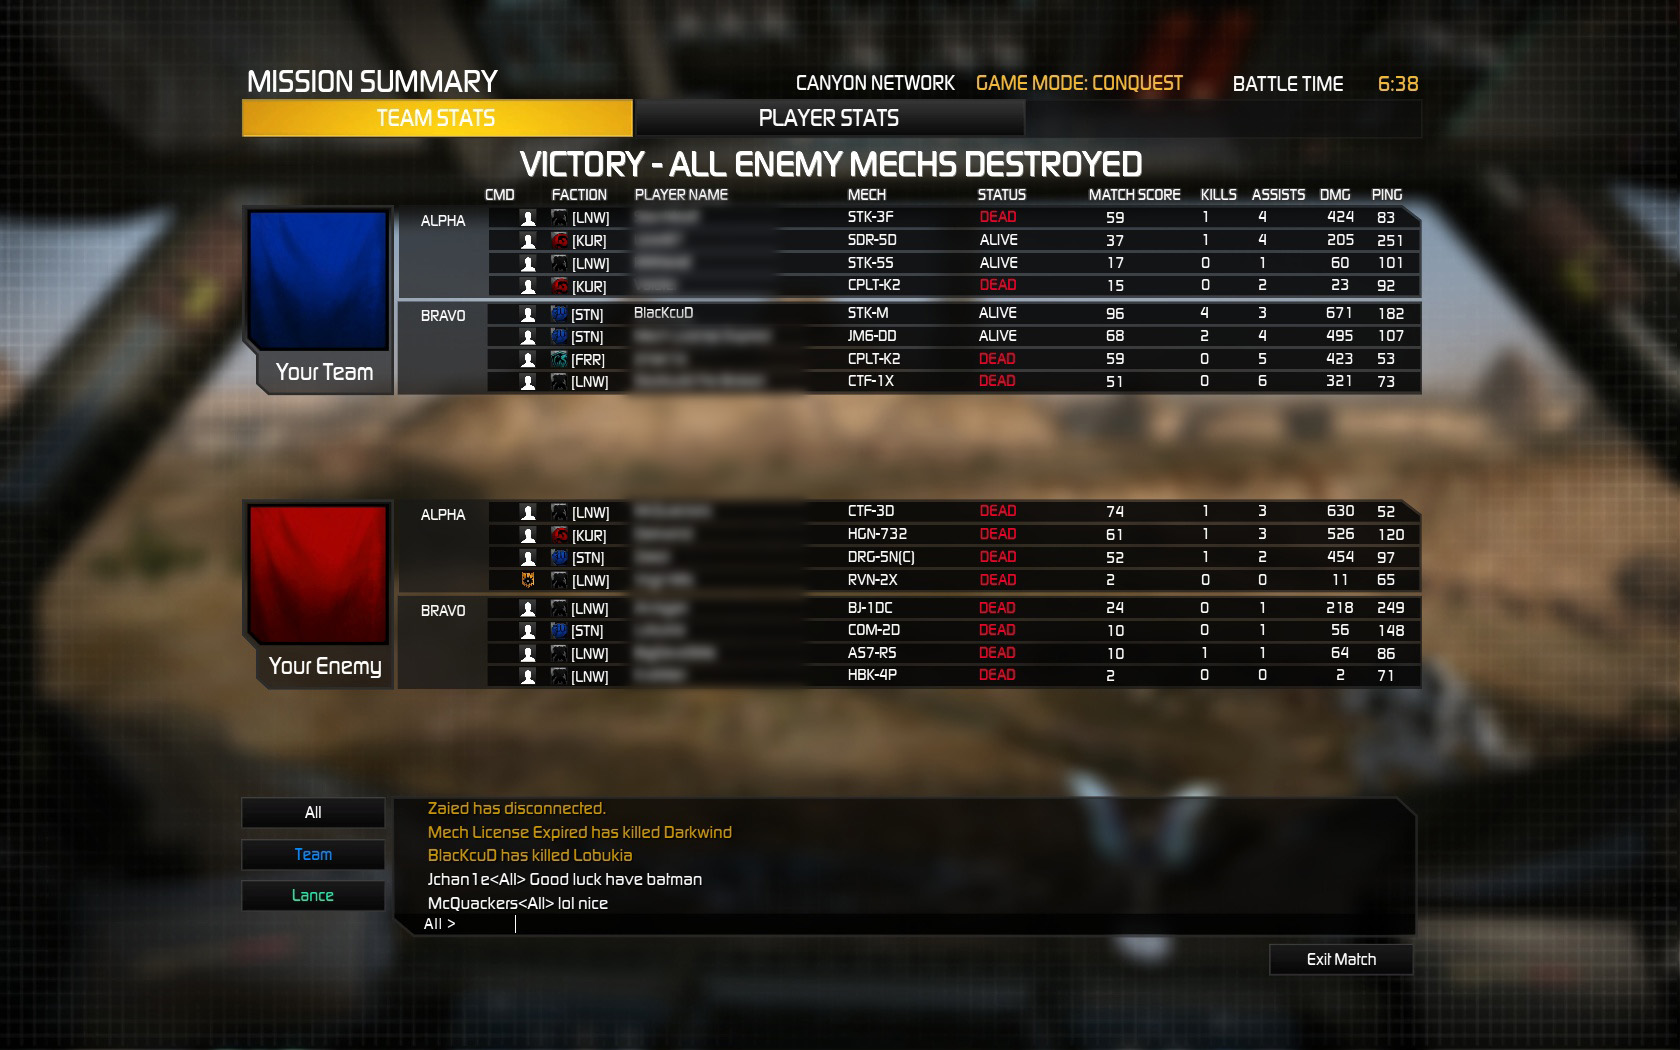
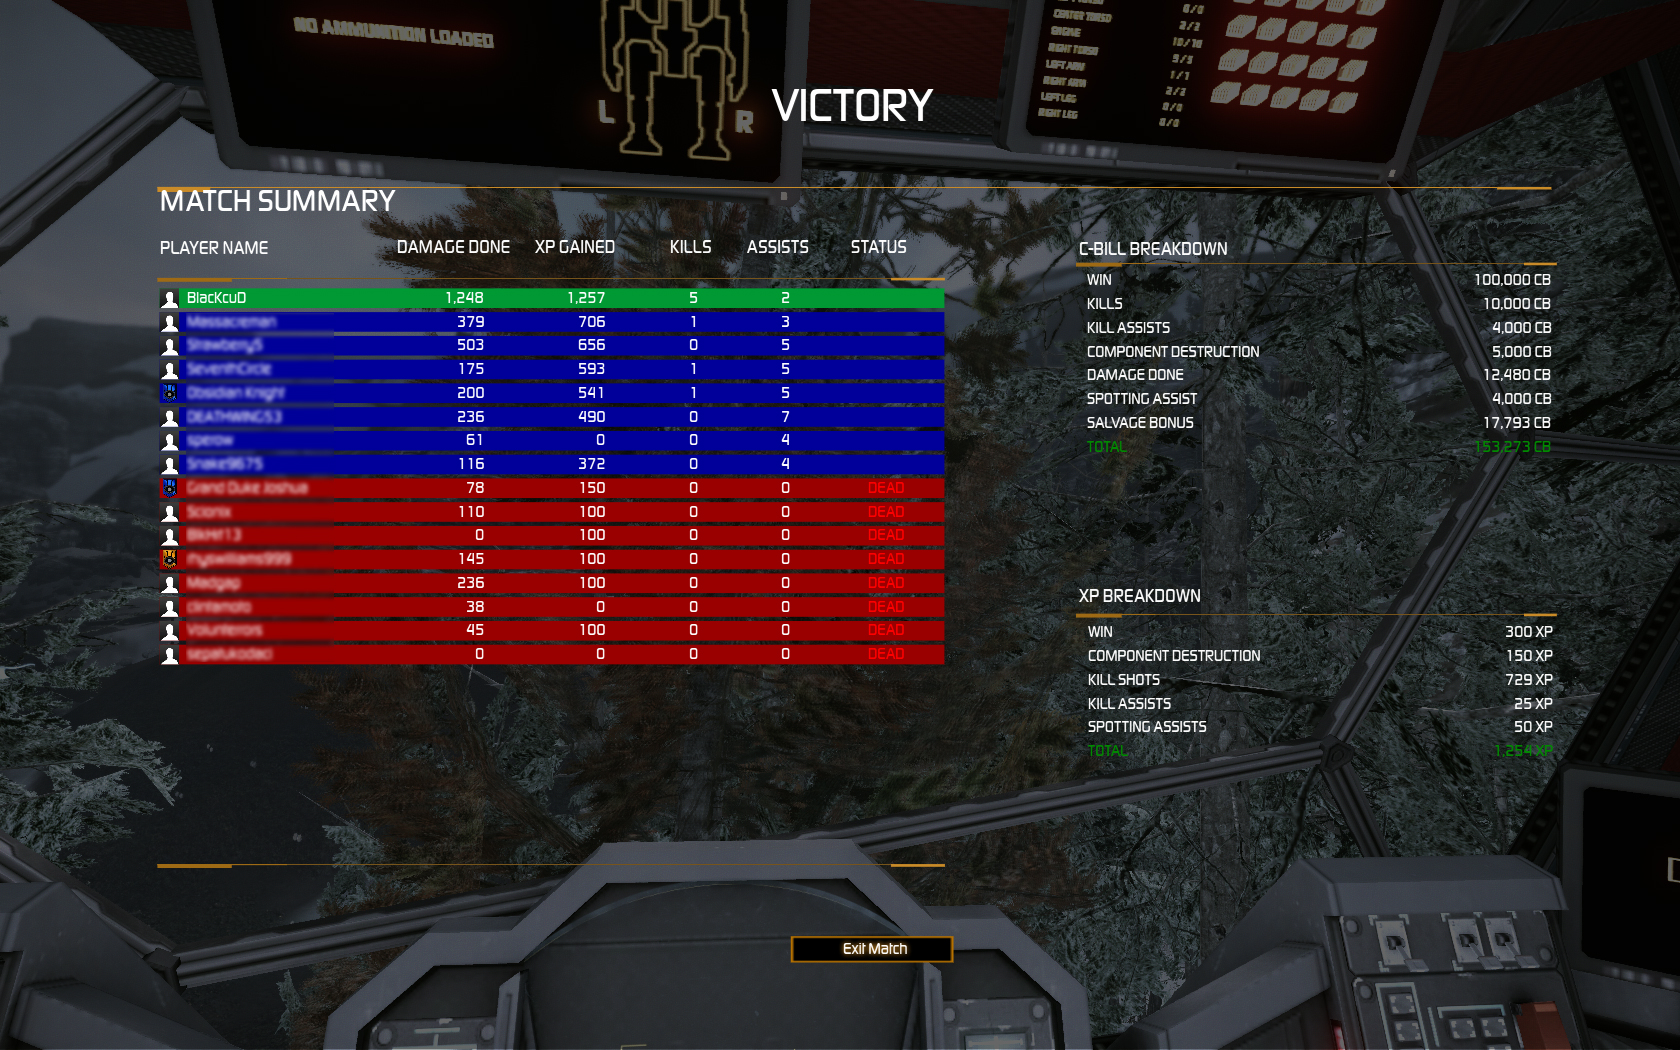
Here are some end-of-round screenshots. They are not the best, but I wanted to include some 12vs12 action!
Get Connected!
If you know of an excellent build, resource, or guide, submit it and maybe it will be featured on mwo-builds.net and seen by thousands of players. You can submit builds by sending us an e-mail, post it in the official looking-for-builds thread, or send us a private message via the official forums. You can also submit guides and builds via Facebook or Twitter (see below). Join hundreds of other Mechwarrior enthusiasts and like us on Facebook and follow us on Twitter. Receive the latest guides and the best MWO builds directly to your favourite social platform!| Follow @mwobuildsnet |
People who read this guide also read:
Ilya Muromets (Cataphract Hero Mech) Dual Gauss Sniper Build
![]()
With the recent patch discouraging PPC and AC/20 boats, Cataphracts have been struggling to find new builds. If you are running you a 2X, you can build a brawler following this Cataphract 2X brawler guide. A more popular variant is the Ilya Muromets, the Hero Mech. A friend of mine at the Hell’s Black Aces Merc Corp showed me a build which has quickly become popular amongst competitive gamers. An Ilya Muromets build which is equipped with dual Gauss Rifles, Medium Lasers, and a Machine Gun. High alpha strikes, way above average dps and no heat issues what so ever make this Mech a fearsome opponent.
![]()
AMS + Machine Gun for critical hits and survivability
Higher movement speed version with AMS
Higher movement speed version without AMS but 3rd Medium Laser
![]()
- Cataphract plus XL-engine makes you very susceptible to frontal damage. If you come under heavy LRM, AC or PPC fire from the front, take cover immediately or you will die in seconds.
- Always use your Gauss Rifles together. The pinpoint damage will make short work of what ever component you are targeting.
- When at close range, keep those Medium Lasers and the Machine Gun fire buttons held down! It is almost impossible to overheat with this build.
- Your damage output is easily focused on one point, and the damage per second at close surpasses most other builds currently in the game. If you are entangled in a brawl, keep firing all the time. Your enemies will most likely underestimate your firepower and only turn around, when it is already to late.
![]()
This build was brought to my attention by Smeg of the Hell’s Black Aces Merc Corp. Check out their web page!
Get Connected!
If you know of an excellent build, resource, or guide, submit it and maybe it will be featured on mwo-builds.net and seen by thousands of players. You can submit builds by sending us an e-mail, post it in the official looking-for-builds thread, or send us a private message via the official forums. You can also submit guides and builds via Facebook or Twitter (see below). Join hundreds of other Mechwarrior enthusiasts and like us on Facebook and follow us on Twitter. Receive the latest guides and the best MWO builds directly to your favourite social platform!| Follow @mwobuildsnet |
People who read this guide also read:

The Highlander 732/733C PPC Sniper Build (updated for Alpha Patch July 2013)
![]()
The Highlander is one of the best assault chassis and quickly became a favourite of my own. Sniper builds are everywhere, and no match goes by without countless PPCs fired at you. It is time to strike back. Obviously, some variants are better suited for the job than others. If you like a sturdy armor and heavy armor, but don’t want to slack on the mobility side: Congratulations! You just found one of the best PPC sniper builds currently known to the Mechwarrior Online community. This Highlander 732 PPC sniper build combines the unmatched armor and firepower of assault chassis’ with excellent mobility.
![]()
Note: this exact same build can be built on the 733C as well.
The recent Mechwarrior Online Patch made PPC boats very ineffective. However, you can use the following build until July 20th 2013. After that you will have to rely on the above build.
Warning: the following builds are not very effective any more! You must use chain fire or multiple weapon groups in order to still use them. It is highly recommended switching to the a fore mentioned builds.
The 3 PPCs and the Gauss Rifle will grant you with unmatched firepower. Alpha strikes of 45 damage at a reasonable heat dissipation will tear enemies to shreds with only a few shots. Light Mechs will die instantly most of the time.
Since LRMs are making a huge comeback you may want to add an AMS to your build. Here is a slight variation on the above build which includes an Anti-Missile-System. This will reduce your damage only very slightly, but the increased survivability is often worth the small cost. This Mech is using an XL-engine after all.
- For maximum efficiency, group your weapons as follows: 1 Gauss Rifle 2 All three PPCs 3 Gauss Rifle plus one PPC (when high on heat) 4 All three PPCs in chain fire (for test shots and disabling ECM).
- All your PPCs and the Gauss Rifle are on one side of your Mech. Whenever you are under heavy fire or LRMs are inbound, turn your upper torso so the other side of your Mech faces the enemy.
- Use jump jets to look over cliffs. Often times you will be able to even shoot Mechs will falling back down.
- Be careful not to harm your legs from excessive jump jet usage. Rule of thumb: when using more than 75% of your jump jet energy, you will take damage to your legs upon landing. Try to reserve some fuel to soften your landing.
- When close to overheating, keep firing your Gauss Rifle plus a single PPC. This will cause very little heat and allows you to continue damaging the enemy with roughly 60% of your firepower. This is always better than overheating or not firing at all.
![]()
![]()
If you know of an excellent build or guide, submit it and maybe it will be featured on mwo-builds.net and seen by thousands of players. You can submit builds by e-mail, post it in the official looking-for-builds thread, or send us a private message via the official forums.
Don’t forget to like us on Facebook and follow us on Twitter to receive the most recent guide directly to your favourite social platform.


People who read this guide also read:


Please note: This guide may still be viable, but is very old.
You will probably find better ones or will need to tweak a few things. In addition, some or all meta game information and play style/hints may include outdated information. As soon as an updated version is available, it will be shown here. If you have up-to-date information on how to improve this build, please leave a comment below. Thank you.
The Misery is the Stalker Hero Mech. Like all other Hero Mechs, it features unique hardpoints, a c-bill boost and a fantastically looking paint job. But what to do with these hardpoints? The following Misery build combines all the chassis’ strengths into a dedicated sniper build which fits very well into the current meta game. It is very difficult to put together a Misery build which really packs a punch. The only other viable option, which we found so far, is combining Large Pulse Lasers and an Ultra AC/5. This close quarter combat oriented misery build will be discussed in another post.
![]()
It is possible to slightly alter this Misery build by stripping armor on the legs and cockpit and/or removing one Double Heat Sink. However, you will run into critical slots aka space problems soon. The only worthy alternative is to get an AMS in exchange for heat efficiency. The Artemis is not needed with this specific build. I am just too lazy to update the build.
![]()
- You are piloting an assault Mech, but you are by no means indestructible. The Misery’s side torsos are also quite exposed. If you have incoming missiles, twist your upper torso sideways and move behind cover.
- It may be tempting to put all weapons on one weapon group and activate armlock for maximum pinpoint damage. However, experience has shown that two separate groups are more viable. Fire quick shots with your PPCs and only add the Gauss Rifle if you are completely sure that the shoot will hit.
- If you are above 50% heat, use the Gauss Rifle only. Try not to overheat or you will be dead more quickly than you can say shutdown.
- Use single/chain fire of your PPCs to disable enemy ECMs.
- PPCs have a minimum range of 90m. Do not fire them at close range ever!
![]()


People who read this guide also read:
Please note: This guide may still be viable, but is very old.
You will probably find better ones or will need to tweak a few things. In addition, some or all meta game information and play style/hints may include outdated information. As soon as an updated version is available, it will be shown here. If you have up-to-date information on how to improve this build, please leave a comment below. Thank you.
![]()
This is the second featured Stalker setup in the current series of Stalker builds. When resorting to a xl-engine, it is possible to equip this chassis with 6x PPC. This equals an alpha strike of 3 AC 20s but is able to fire twice as far. Making killing blows is very easy with this build. There are only very few other builds which can produce such an big alpha strike.
![]()
![]()
- Do not be afraid to do a shoot which will overheat you. But only do this if you are sure to at least heavily cripple your enemy.
- PPCs have a minimum range of 90m. Light Mechs will tear you to shreds. Always stay with some lighter Mechs which can aid you.
- Enable Arm-Lock in the options menu. This way you will ensure maximum pinpoint damage.
- Even heavy Mechs can be two-shoted with this build. Always aim for center torso (worst case scenario: you rip out a shoulder)
- You alpha-strikes generate 50-75 heat (depending on map). Do not shoot if you are already at 80-99 heat or your engine will blow up.
![]()
People who read this guide also read:
![]()
I finally delved into the Stalker chassis and bought three of them (Misery, 3H and 3F). Let’s start with a Stalker 3H build. This build is an LRM-Boat but features excellent close-range defensive capabilities in the form of Medium Lasers and Streak SRMs. It also comes with a Beagle Active Probe and an Anti-Missile System. In my opinion, the Stalker 3H is one of the best Mechs to build an LRM-Boat.
![]()
![]()
- Stay behind your teammates to provide firing support.
- Always tag enemies, but do not expose yourself too long to enemy fire.
- Your optimal attack range is ~250m; at this range you can fire all your weapons at once.
- The minimum range for LRMs is 180m. If you are closer to your target they will do NO damage.
- Do not forget to open your missile bay doors at the beginning of each match. The lights at the border of your screen will switch from yellow to green when they are opened.
![]()
People who read this guide also read:
Please note: This guide may still be viable, but is very old.
You will probably find better ones or will need to tweak a few things. In addition, some or all meta game information and play style/hints may include outdated information. As soon as an updated version is available, it will be shown here. If you have up-to-date information on how to improve this build, please leave a comment below. Thank you.
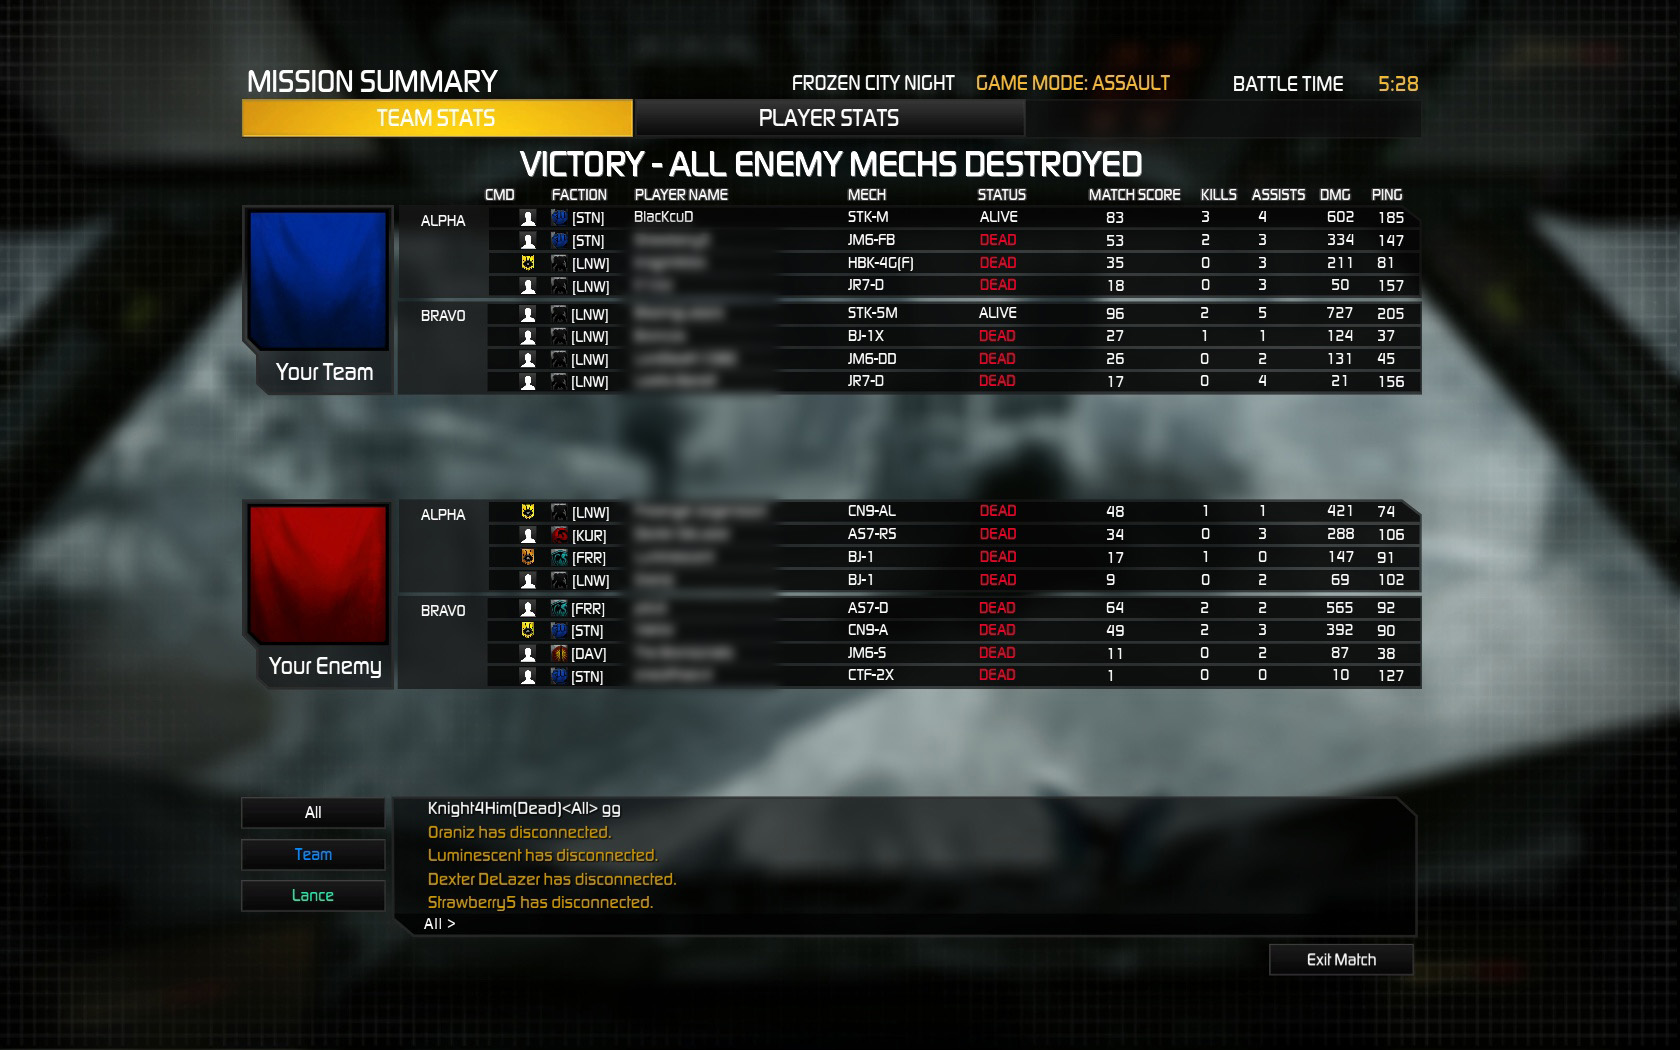
The second guide today will be the infamous Stalker PPC build. There are many iterations of this build. This particular version tries to maintain heavy sniping capabilities without sacrificing close quarter combat capabilities entirely. Anudiz posted this guide in the current search thread. Be sure to drop by his profile and leave him a thumbs-up (link at the end of the guide).
![]()
![]()
![]()
![]()
![]()
![]()
- Stalker STK-3F
- Standard Engine 280
- Reduce armor on head and legs. Max all torso parts.
![]()
- 2x SRM 4 (3x SRM Ammo)
- 2x SRM 2
- 4x PPC
![]()
- Maintain sniping range as long as possible.
- Avoid the temptation of heavy brawling. Your SRMs improve your close quarter capabilities a lot but this is a sniper build. Stay out of the action and use SRMs only to finish off damaged opponents.
- If you notice a damaged component on an enemy. Try to take it out quickly with a precise strike from all four PPCs.
- Set up a chainfire PPC weapon group. You don´t want to alpha strike every single time.
![]()


Get Connected!