 Commando
 Death’s Knell
 Raven
Raven Spider
 Hunchback
 Blackjack
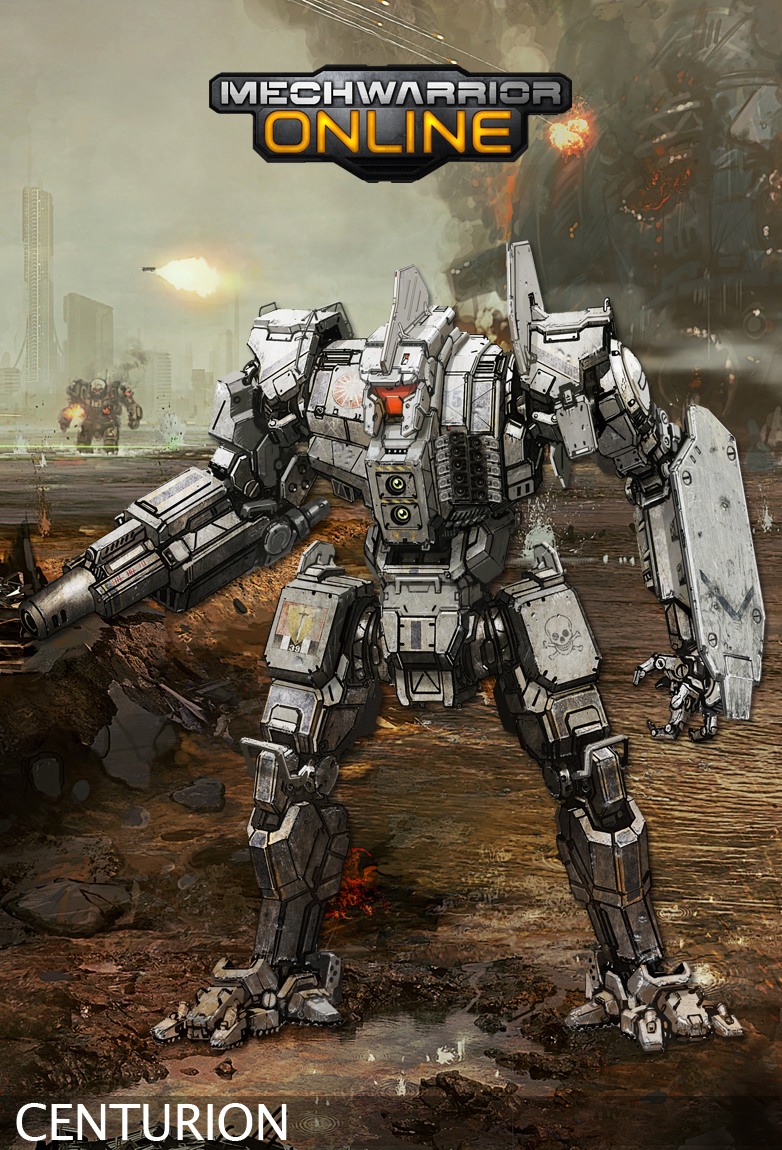
 Centurion
 Yen-Lo-Wang
 Cataphract
 Ilya Muromets
 Jagermech
 Firebrand
 Quickdraw
 Atlas
Atlas Awesome
 Pretty Baby
 Battlemaster
 Highlander
 Stalker
 Misery
 Ballistic Weapons
 Lasers and PPCs
 Short Range Missiles
 Long Range Missiles
-
Do You Play other Games, too?
1 Aug 2014
-
The Best Shadowhawk 2D2 Brawler
13 Nov 2013
-
Competetive Spider 5D Build
7 Nov 2013

-
Shadowhawk 2H (P) Damage Dealer
23 Oct 2013
Category Assault
![]()
I finally delved into the Stalker chassis and bought three of them (Misery, 3H and 3F). Let’s start with a Stalker 3H build. This build is an LRM-Boat but features excellent close-range defensive capabilities in the form of Medium Lasers and Streak SRMs. It also comes with a Beagle Active Probe and an Anti-Missile System. In my opinion, the Stalker 3H is one of the best Mechs to build an LRM-Boat.
![]()
![]()
- Stay behind your teammates to provide firing support.
- Always tag enemies, but do not expose yourself too long to enemy fire.
- Your optimal attack range is ~250m; at this range you can fire all your weapons at once.
- The minimum range for LRMs is 180m. If you are closer to your target they will do NO damage.
- Do not forget to open your missile bay doors at the beginning of each match. The lights at the border of your screen will switch from yellow to green when they are opened.
![]()
People who read this guide also read:

With the Pretty Baby a powerful Awesome variant enters the battlefield. Those of you who can bring the required money to the table will be rewarded with an excellent Assault Mech which can outplay any opponent using its strong armament and the outrageous xl engine 400! This guide was kindly provided by BertyBargo via the official forums. Be sure to drop by his profile and leave him a thumbs-up (link at the end of the guide).

![]()
![]()
![]()
![]()
![]()
![]()
- Awesome – Pretty Baby (Hero Mech)
- XL Engine 400
- Max armor on all parts
![]()
- 3x SRM6 (4x ammo)
- 3x Medium Pulse Laser
![]()
- Your torso twists very fast and very wide. Turn your torso sidewards when charging enemies. Your broad front is an easy target but when moving at high speeds and turning 90 degrees sideways you are almost unhittable. In addition the parts that will be hit this way have more armor and shield your XL engine. It is literally possible to Matrix dodge incoming projectiles.
- As with all relatively fast Mechs: Try not to be the first on the frontline. It is very tempting to rush headlong into your death. Move at slower speeds at the beginning of the match or even better, try to circle around the enemies.
- Try to distribute incoming damage. You can easily twist your torso to show more intact parts to your enemy, even your back is a valid option if your center torso is critical upfront.
- This is an assault Mech but you can very effectively run away with it. You will live longer, can come back and increase your match score greatly by living to die another day.
A similar build can be used without buying the hero variant using a AWS-9M. You can check out the smaller build by clicking here.
![]()
People who read this guide also read:


Please note: This guide may still be viable, but is very old.
You will probably find better ones or will need to tweak a few things. In addition, some or all meta game information and play style/hints may include outdated information. As soon as an updated version is available, it will be shown here. If you have up-to-date information on how to improve this build, please leave a comment below. Thank you.
The second guide today will be the infamous Stalker PPC build. There are many iterations of this build. This particular version tries to maintain heavy sniping capabilities without sacrificing close quarter combat capabilities entirely. Anudiz posted this guide in the current search thread. Be sure to drop by his profile and leave him a thumbs-up (link at the end of the guide).
![]()
![]()
![]()
![]()
![]()
![]()
- Stalker STK-3F
- Standard Engine 280
- Reduce armor on head and legs. Max all torso parts.
![]()
- 2x SRM 4 (3x SRM Ammo)
- 2x SRM 2
- 4x PPC
![]()
- Maintain sniping range as long as possible.
- Avoid the temptation of heavy brawling. Your SRMs improve your close quarter capabilities a lot but this is a sniper build. Stay out of the action and use SRMs only to finish off damaged opponents.
- If you notice a damaged component on an enemy. Try to take it out quickly with a precise strike from all four PPCs.
- Set up a chainfire PPC weapon group. You don´t want to alpha strike every single time.
![]()

People who read this guide also read:


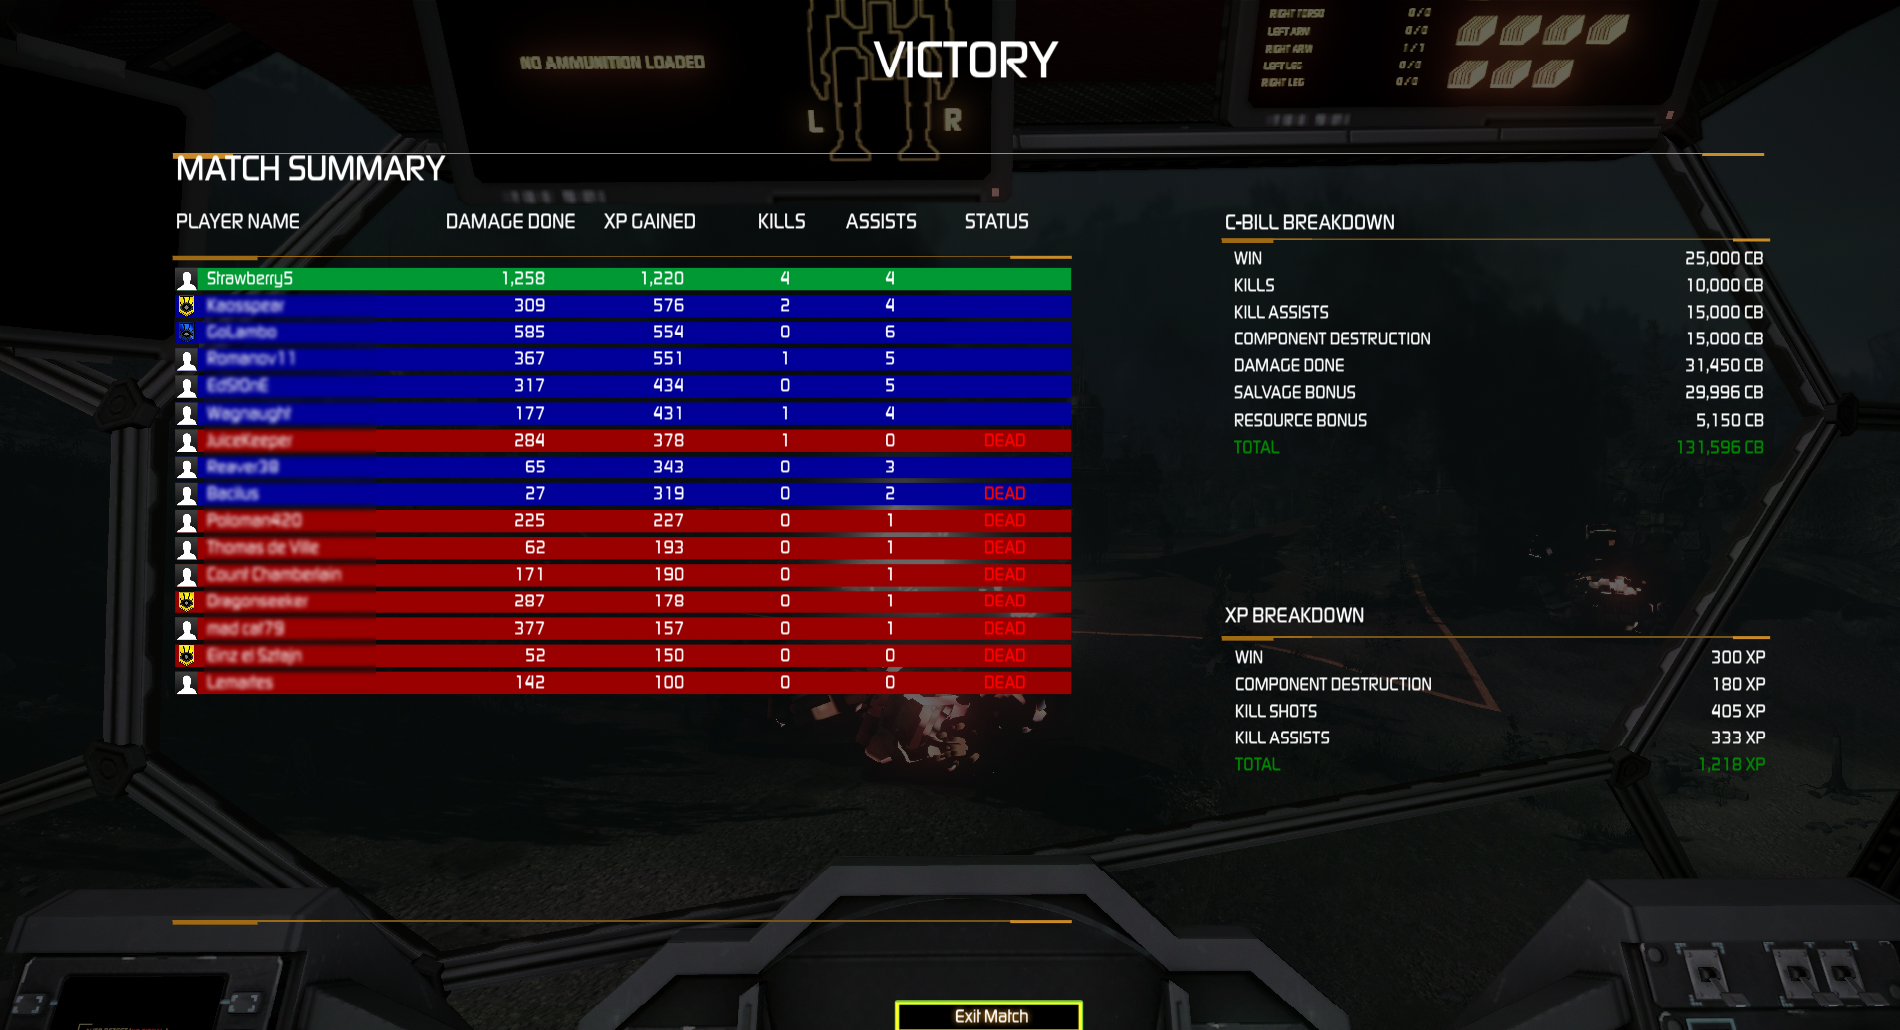
One of my best friends, Strawberry5, has great success with an Atlas Brawler build, almost always topping the scoreboard and blowing scrubs to bits and pieces. This guide is the result of hours of grinding and experimenting and represents the, in my opinion, currently best load-out if you want to go toe to toe with your foes as an Atlas pilot. Be sure to drop by his profile and leave him a thumbs-up (link at the end of the guide).
![]()
![]()
![]()
![]()
![]()
![]()
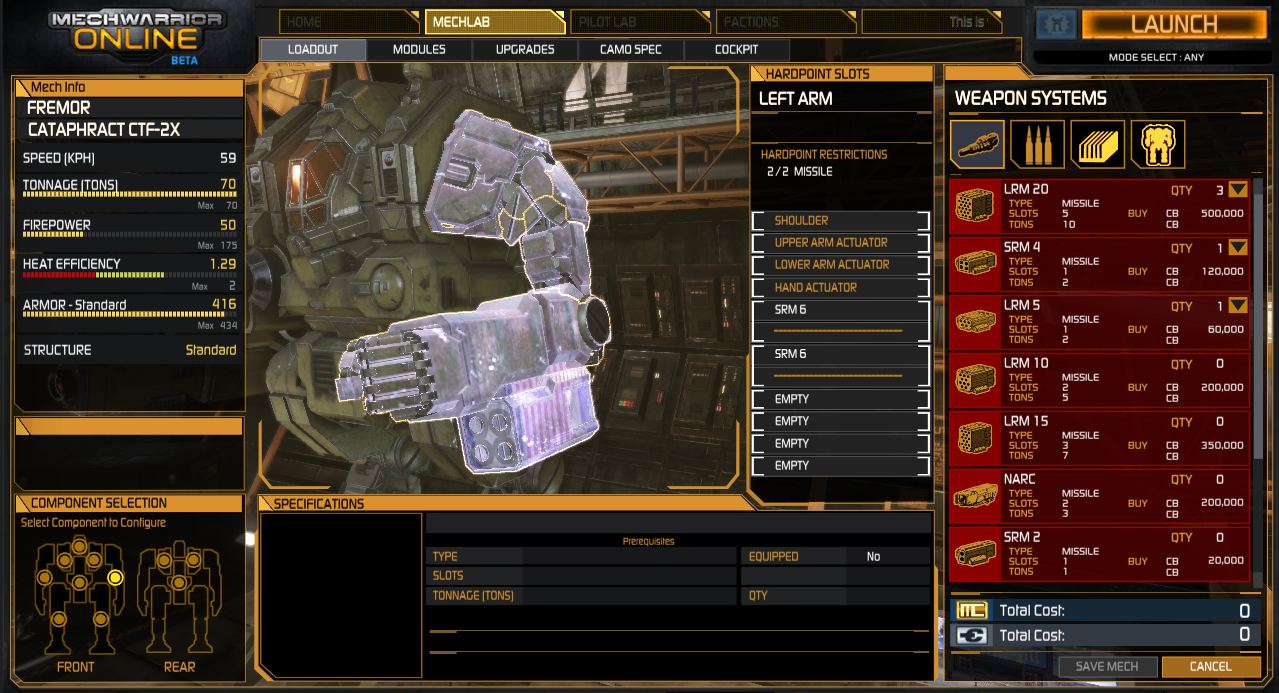
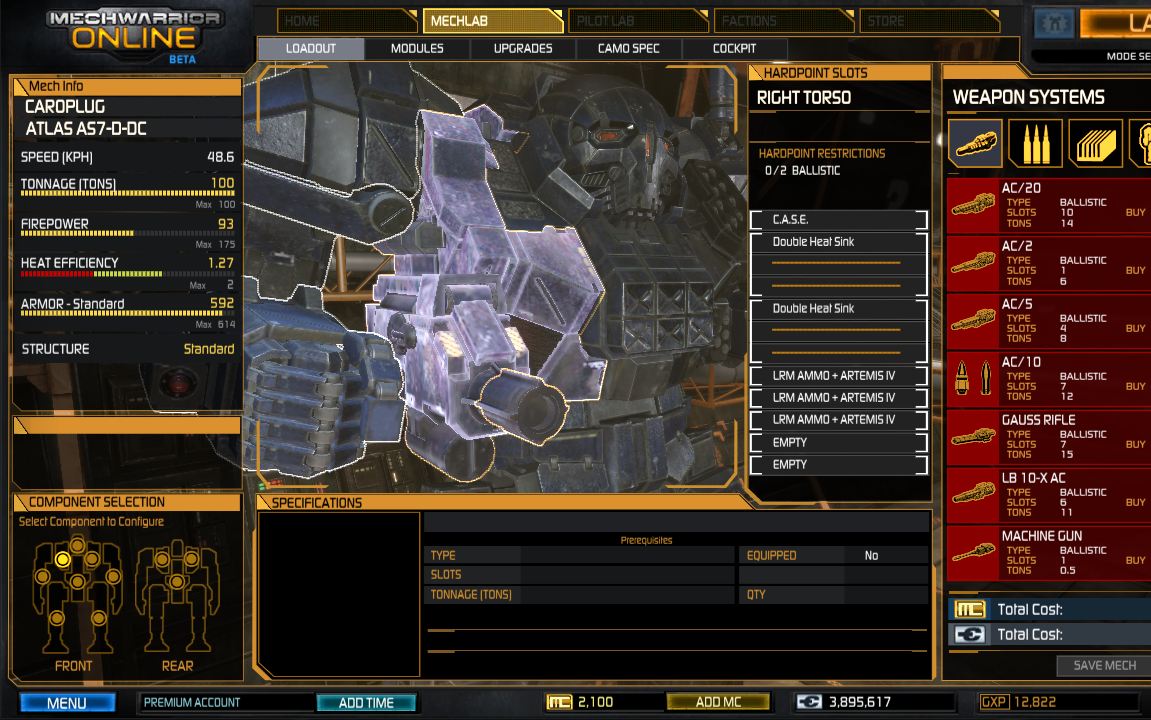
- Atlas AS7-D-DC
- Standard Engine 350
- Max armor on all torso partitions, reduce both legs to ~41 and both arms to ~52
![]()
- 2x UltraAC/5 (7x ammo)
- 2x Medium Laser
- 3x StreakSRM2 (3x ammo)
- 1x C.A.S.E. (3x SSRM2 ammo and 2x UAC/5 ammo in left torso)
- Anti-Missile System (1x ammo)
- Guardian ECM (place in right leg to avoid early destruction)
![]()
- Always move at max speed (>62kph with upgrades) if possible. This will make your worst enemies (SRM6s, AC/20s, Gauss Rifles) miss your mech more often.
- Use the high max range of your double UltraAC/5 to lay down suppressing fire and chip away at enemies during the first minutes of the match. Enemy LRM-boats and other long range builds will duck back behind cover and potential future enemies will have their starting armor reduced.
- Always try to entangle your enemies in close quarters combat as soon as possible. You are one of the most fearsome brawlers on the battlefield; make your enemies brawl as well whether they want to or not.
- Fire your UltraAC/5s by single clicking at all times (1.1sec). Restrain yourself from holding down the key as they will most likely jam very fast and your actual damage output will decline. Only gamble on your weapons not jamming when being faced with certain death.
- If your ECM gets blocked (mostly by light mechs), switch to counter (hotkey J). Afterwards, find the ECM bearing mech and dispose of it with your triple SSRM2s and lasers.
- Keep in mind that your ECM will not protect you from LRM barrages while it is set to counter mode.

![]()
People who read this guide also read:
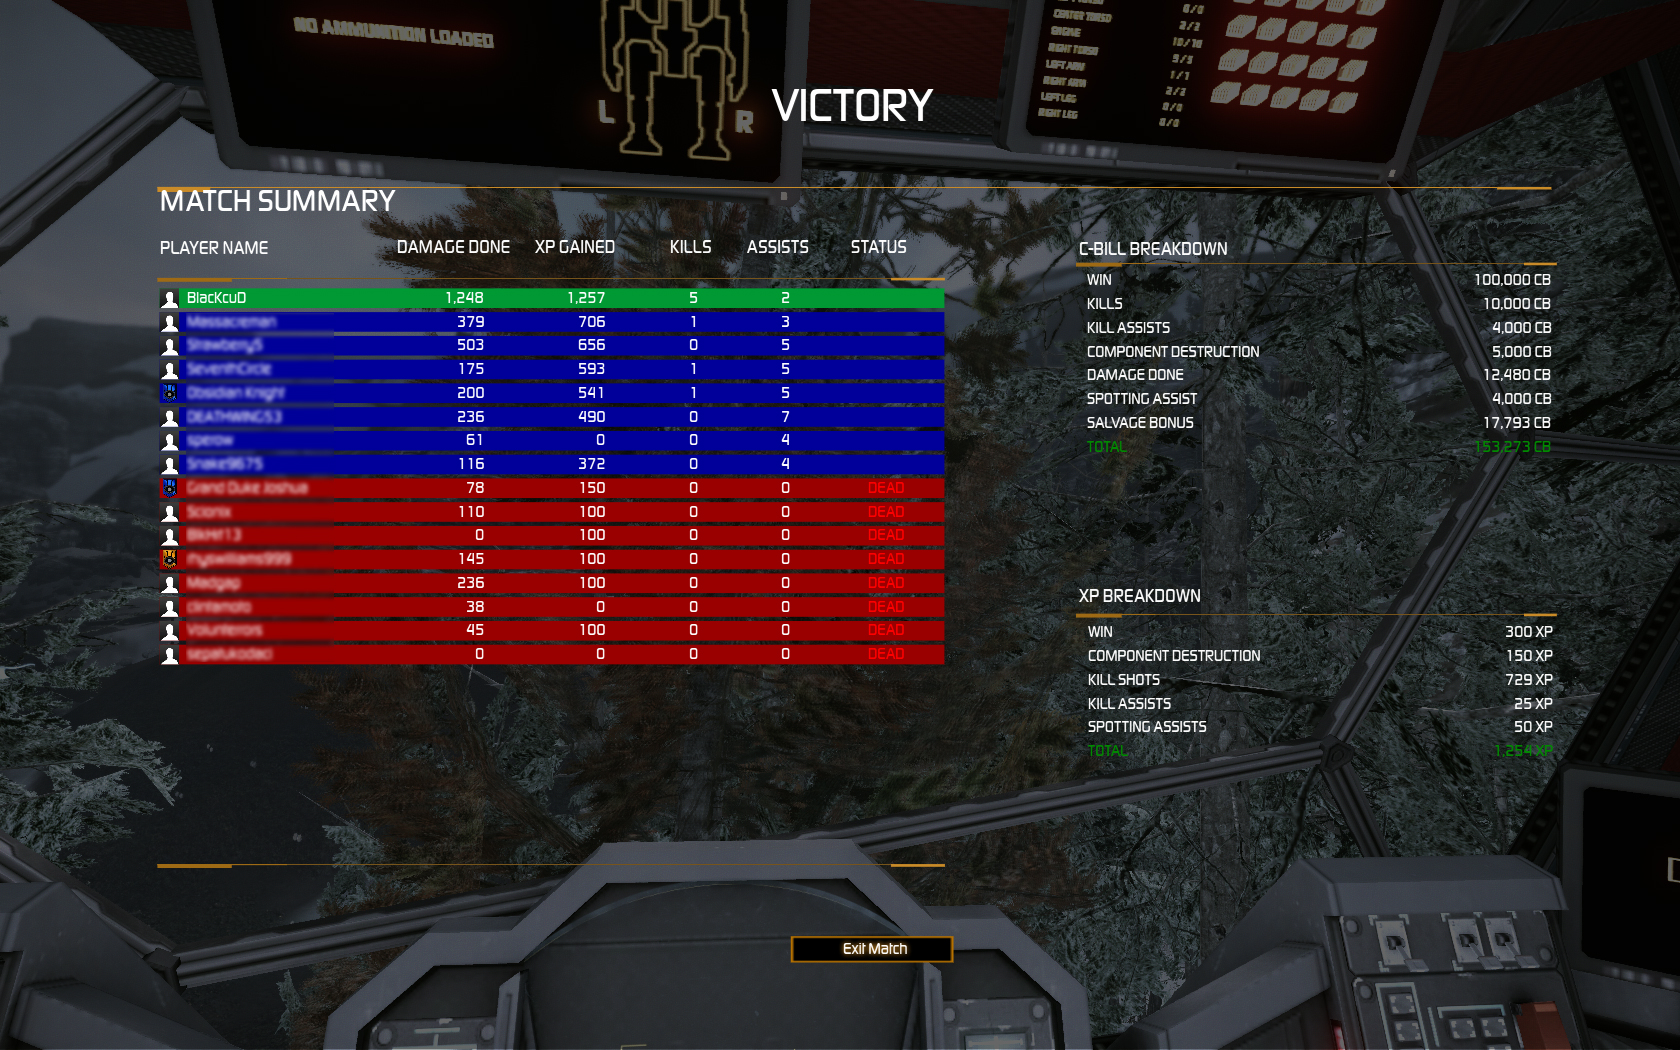
Find Catapults a little lame? Already bought an Atlas and you don´t know how to effectively get XP and CBills with it? Want to be top3 of the scoreboard for 10 rounds in a row? Look no further. The Atlas Deluxe LRM Boat will make this all happen.
Atlas LRM Boat Setup (updated)
![]()
- Atlas AS-D-DC
- Standard Engine 300
- Maxed Armor (except legs, ~73 each)
![]()
- 3x LRM15+Artemis (9x ammo)
- 2x Medium Pulse Lasers
- CASE in right torso along side 2 DHS and 3x LRM Ammo
- Guardian ECM (mount in legs to avoid early destruction)
- AMS (1x ammo)
- Fill remaining slots with DHSs such that you will have 16 (with engine heat sinks) in total
![]()
- Artemis requires line of sight. Your ideal position will be ~500-800 meters away from the target and ideally within line of sight (e.g. river bank)
- You are worthless in melee (LRMs have a minimum range of 180). If you don´t know what to do, fall back to your nearest friendly.
- Conserve ammo by not overnuking low health enemies and only firing if you are absolutely sure the target will be locked for some more seconds.
- If you get jammed by an ECM, don´t panic. Switch your ECM to counter (hotkey J) and continue firing LRMs. If no target is available for LRM fire switch to your Medium Pulse Lasers and engage whatever is jamming you, while constantly falling back to friendlies who can help you get rid of the pest.
- If none in your lance can provide TAG, experiment with switching one Laser for it.
- Add more armor than usual to your rear. If you are getting pounded, it will most likely be from behind.
Atlas LRM Boat
People who read this guide also read:
Endo Steel Structure is a Mech upgrade that you may purchase for roughly one million c-bills on every Mech (depending on Mech size). It will provide you with a hand full more tons (5% of the total weight) to play with but also occupy many critical slots (the lines where you put your equipment in).

Endo Steel Structure Upgrade
Cost versus gain
Depending on your mech´s size the upgrade will roughly cost one million c-bills. Beware that undoing the upgrade will cost you roughly half that amount again! In addition,you will lose internal space to put items, called critical slots; 14 to be precise. In turn your mech´s structure will weigh only half and thus adding 5% more tonnage to play with. These 5% depend on your Mech size and can be calculated as “Maximum tonnage times .05″. Example: for an Atlas you will have 100 tons and upgrading Endo Steel Structure will yield you 5 additional tons. A Hunchback weighing only 50 tons will get a bonus of 2.5 tons.
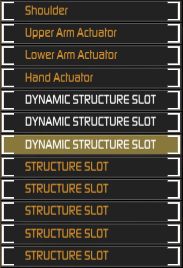
Dynamic Structure Slots
How does it work ingame: Dynamic Structure Slots
Once you´ve purchased the Endo Steel Structure upgrade, you will notice two new kinds of items appearing in your critical slots (the lines where you equip your stuff): Dynamic Structure Slot and Structure Slot. These mark the places where the Endo Steel Structure resides within your Mech. However, they can be automatically moved to a certain extent: Dynamic Structure Slots can be treated like free slots. The Structure will be moved to another part of your Mech (where ever some space is left), and you can mount your items in Dynamic Structure Slots like in any other free slot.
Once you no longer see Dynamic Structure Slots you are out of space. If you are out of space and still have some tons left, I´d recommend maxing out armor and see if you can upgrade a weapon to something heavier without using up (much) more space e.g. Medium Laser to Medium Pulse Laser.
When to purchase Endo Steel Structure
The following list will give you a rough idea on when to consider Endo Steel and when you should think of something else. However, certain situations and builds may contradict these guidelines.
- Endo Steel Structure is highly recommended on light and medium Mechs. Heavys often times but normally never a good idea on Assaults.
- If you need more heat sinks and/or more ammunition do not go for Endo Steel, but consider upgrading to Double Heat Sinks.
- If you are planning not to put much/anything in your arms go for Endo Steel Upgrade.
- The smaller/lighter your Mech the higher the chance Endo Steel is worth a look.
- If your Mech runs with a lot of lasers, stream srm2 and other small weapons with little/no ammo Endo Steel Structure is worth a look, too.
Get Connected!